

As promised (and delayed once) this post will go over the case design. The following were the idea’s I had in my head when I started.
- two “compute pods”, each holding six servers with their disks and a network switch
- one “power pod” containing the power supply
- small footprint and aesthetically pleasing
- cooling by “sucking in” air from the front, expelling through openings at the back
- simple construction using acrylic and aluminium
Material choice
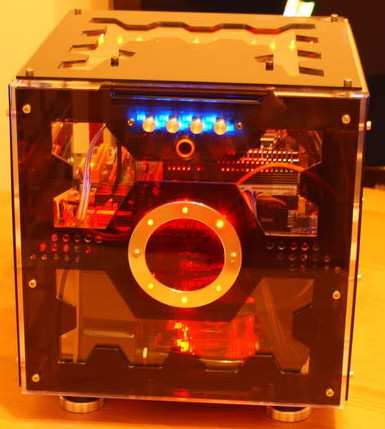 |
| Phinix Cube http://forums.bit-tech.net/showpost.php?p=2010977&postcount=573 |
I really like the look of acrylic “scratch builds” like this Phinix Cube” and I think it would be cool to be able to see the internals of the different pods. I also did a lot of research on scratch builds and it turns out that acrylic is actually quite easy to work with, reasonably scratch resistant and very shatter resistant. It is also much lighter than glass!
I am going for 3mm thick, cast (not extruded) acrylic which should be plenty strong since it will not need to carry any real load: the aluminium will be load bearing.
Design software
The Compute Pod
|
|
|
The compute pods will be almost cubes, the front sizing 300mm x 250mm and 260m deep. On the front I want six 80mm fans, attached to the CPU fan headers on the motherboards. This way, the fans will only be on when the motherboard needs it. I will need to put some kind of dust filter in front of them to avoid sucking in a lot of dust (that is the blue square around the opening).On the back, there are cut-outs to access the motherboard connectors, and at the top left, a space for the switch. On the inside, the blue bars are the aluminium struts that make up the skeleton. the cross-bar near the top is where the disk plateau’s will rest on.
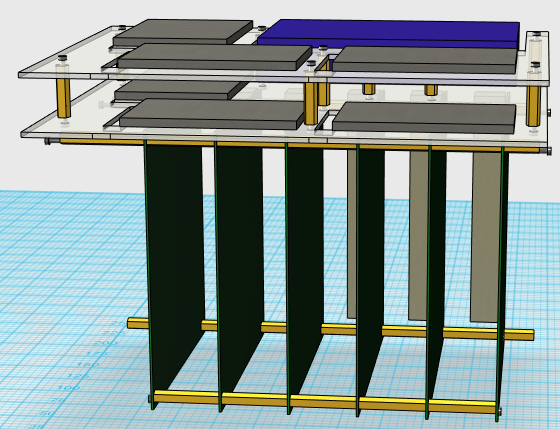
Here the inside is visible, showing the fan mounts and the cross bars that will carry the floating disk assembly.
 |
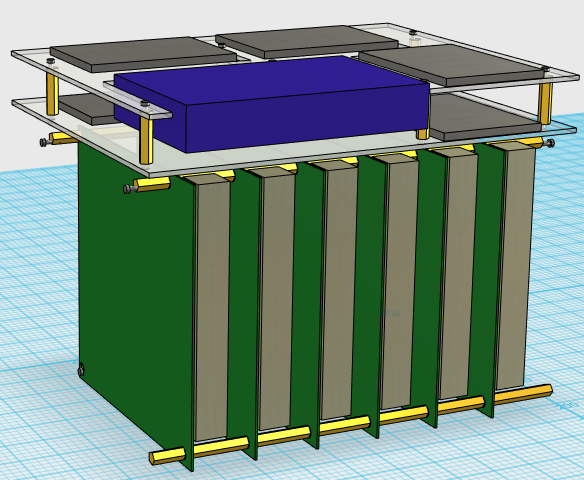 |
This is how the inside will look. The six motherboards in the pod will be attached to each other using spacers. This will make replacing a motherboard a non trivial task, but it is the most space efficient method. Also, I tested it and this setup makes the motherboard assembly quite rigid. The nice thing is that the motherboards are not under any kind of stress since the spacers are interconnected.
An acrylic plate “floats” on top of the motherboards, carrying the hard disks and a second level for more hard disks. This disk assembly will rest on the cross bars. These plates have cutouts to let the SATA and power cables through.
 |
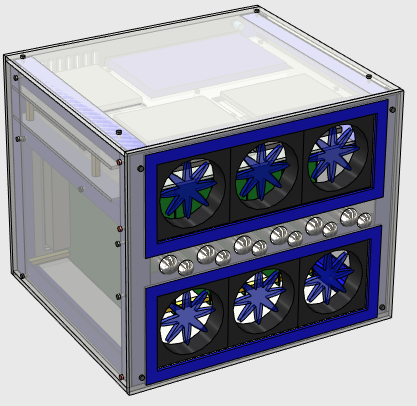 |
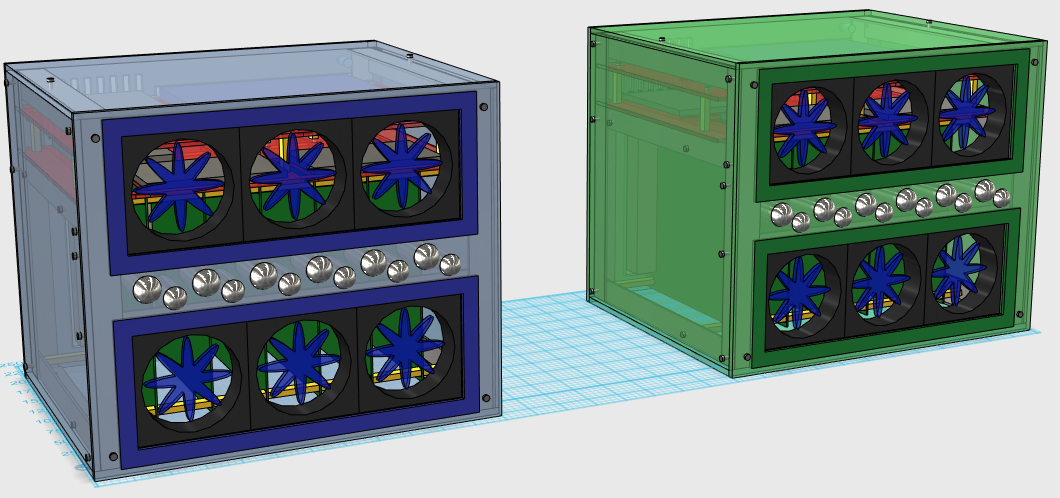
And this is what is should look like when the hardware is placed in the pod.Between the two rows of fans, there are twelve push buttons. These are the power and reset buttons for each motherboard. The buttons will have LED’s to show the power LED and the HDD activity.
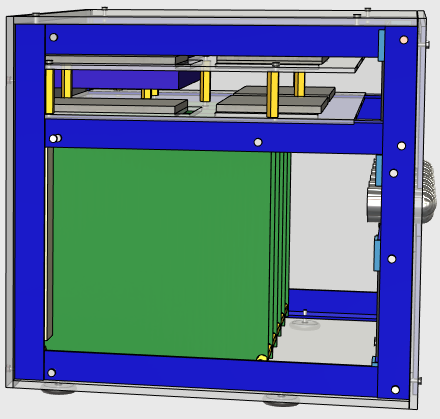
And here is a side view with the side panel removed. There is ample space (I hope) for all the cabling between the motherboards and the fans on the front.
Cable management will be required to make sure the fans can do their job…
I will be making two of these compute pods. I think I’ll leave the aluminium in it’s natural metallic look but have the acrylic tinted green and blue.
The Power Pod
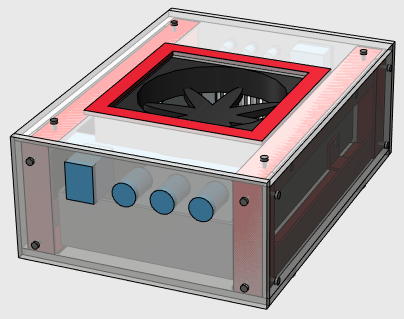
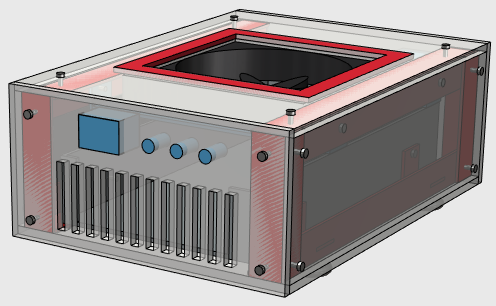
The power pod follows the same design principles, but is much smaller and less complex. The front and back will need some cut-outs for the power buttons and power jacks, plus some air vents.
Since I expect the small fan on the power supply to be of the noisy sort (I could not find details on it), I will open up the power supply casing and put a slow turning 120mm fan right on top of it. Here too, I will need to put a dust filter in the opening.
 |
 |
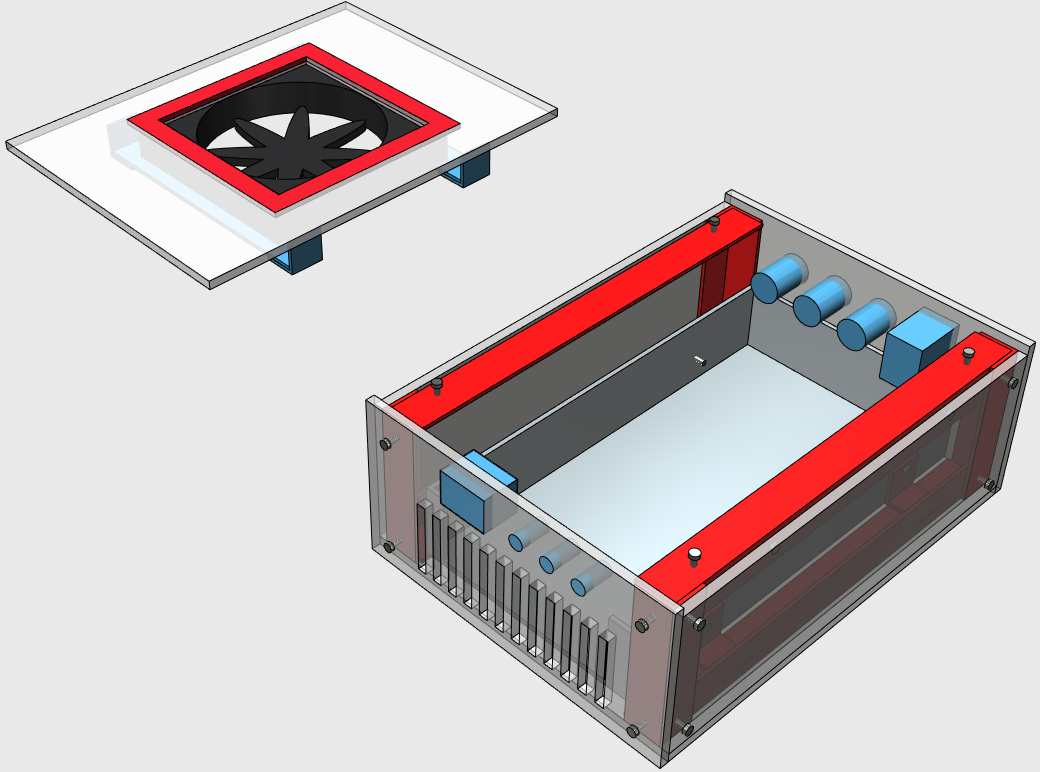
The power supply itself will be attached tot he aluminium frame using small brackets.
The color scheme for this pod will again be blank aluminium and this time red tinted acrylic. I want to use that same red for the disk plates in the compute pods, as you can see in the earlier image. That will give me a nice RGB color scheme.
The Bill of Materials
The next step is to make detailed drawings for the acrylic, so I can have them laser-cut. I want all the screw holes and cut-outs laser cut since this will give nice clear edges and I won’t need to sand everything. I want to let the aluminium shop cut the skeleton parts to size too. This should give a much nicer result than my own amateur hands can deliver. It will also cut down drastically on time, at least if my measurements are any good…
 For the laser cut drawings for the acrylic, I am using Illustrator since that software can do precise positioning and measurements. I also added some engraving, just for fun. 🙂
The blueprint for the compute pods: the blue lines will be cut, the red lines will be engraved.
I’ll be getting two of these, one using light blue acrylic and one using light green, both transparent.
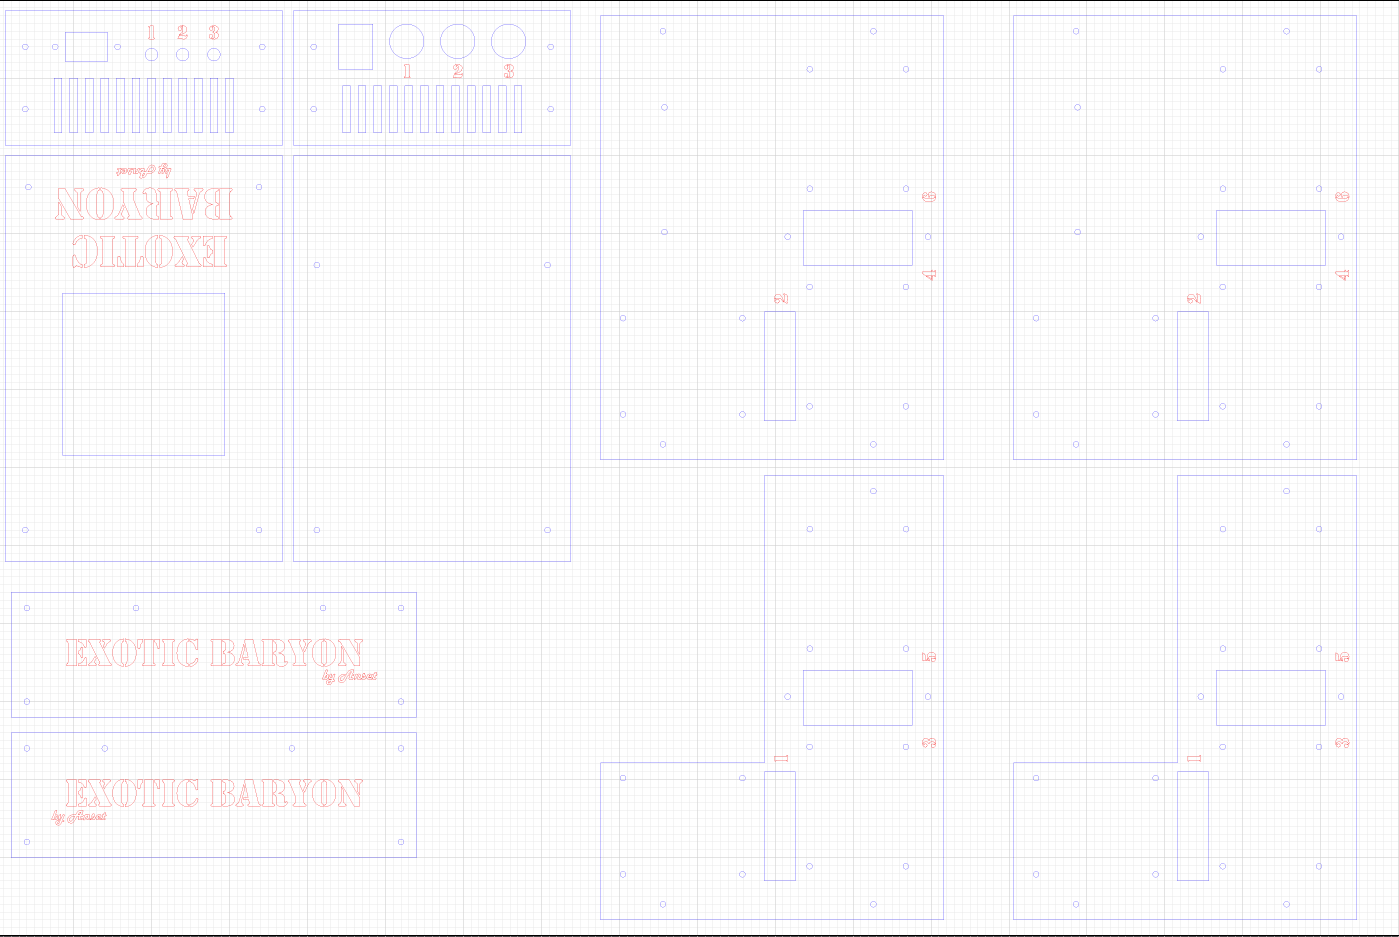
The blueprint for the power pod also contains the four plateaus for the hard disks.
This one will use transparent red arcylic.
This one has some engraving as well. This will probably not be very visible due to the color tinting. But I may put in some extra LED lights later…. We’ll see.
For the aluminium, I just need to do some measuring:
| Compute | mm | mm | mm | # | $ | $ | total length | Total $ | Total $ | |||
| L Profiles | 20 | 20 | 240 | 4 | 2.00 | 1.61 | 960 | 8.00 | 6.44 | Corner poles | ||
| 256 | 6 | 1.99 | 1.63 | 1536 | 11.94 | 9.78 | sleepers top, bottom and middle for disk plateau | |||||
| 20 | 8 | 1.28 | 1.25 | 160 | 10.24 | 10.00 | corners for fan mounts | |||||
| 2656 | ||||||||||||
| Flat bar | 20 | 278 | 4 | 1.69 | 1.45 | 1112 | 6.76 | 5.80 | Fan mounts |
| Power | mm | mm | mm | # | $ | $ | total length | Total $ | Total $ | |||
| L Profiles | 20 | 20 | 80 | 4 | 1.47 | 1.34 | 320 | 5.88 | 5.36 | Corner poles | ||
| 256 | 4 | 1.99 | 1.63 | 1024 | 7.96 | 6.52 | sleepers top, bottom | |||||
| 20 | 8 | 1.28 | 1.25 | 160 | 10.24 | 10.00 | corners for fan mounts and PS fixation | |||||
| 1504 | ||||||||||||
| Flat bar | 20 | 158 | 2 | 1.48 | 1.35 | 316 | 2.96 | 2.70 | Fan mounts |
I’ll need the Compute parts twice, of course.
ATX power/reset cables

While designing the case housing, I figured I would need those little cables with motherboard headers on one end and a power switch, reset switch and some LEDs on the other end. Regular PC cases always come with them pre-installed and I am having a hell of a time finding these cables to use in my cases. In the end , I came across the aliexpress.com site where many Chinese businesses are selling pretty much everything under the sun.
I have no experience with ordering from China directly, at all… But this is the only site I can find that has these cables, so I have little choice. I found a seller offering sets of 20 cables assemblies and I have ordered two sets: I need at least 24 of these because the cable assemblies only have one switch and I need two (reset and power). And this gives me some extra’s to play with. At 4,07 EUR per 20 cables, this is dirt cheap. The shipping is rather more expensive, but as I wrote, I cannot find these cables anywhere else, so…
I am not entirely sure how I’ll fit the switches that come with these cables to the housing though… I did order some LED “holders” that I thought I would to use to fit the led’s to the housing, but now I think I will be getting nicer power switches with led’s in them so I won’t need the LED holders. Still it was only a 7,50 EUR cost, not that bad a loss, but they will appear in the costs tally below.
Miscellaneous
Apart from the above, I also ordered some network cables (CAT 5e), the DC connectors I’ll need for the switches and some electrical wire. I also found these little so called welding clamps that I want to use to build the power wire harness. I had also ordered some acrylic samples earlier to see and feel it before deciding on going acrylic for the housings.
Total spend so far
The acrylic and aluminium are not that expensive, but the laser cutting does add to the price, as does the cutting of the aluminium.
Budget wise, I am still well within my 4.000,00 EUR total budget, but it is getting up there… Still, I think the major costs are now behind me so I am hopeful I won’t break the budget.
| Shop | PartCode | Description | Amount | Price |
| CarTFT.Com | Mitac PD10BI Rev 1 | Intel Bay Trail Celeron J1900 4×2.42Ghz | 12 | 72.70 |
| CarTFT.Com | Verzending en afhandelng | 1 | 13.53 | |
| SiComputers.nl | CT51264BF160BJ | Crucial PC3-12800 4GB | 24 | 23.50 |
| SiComputers.nl | WD5000LPVX | Western Digital Blue 500GB SATA 6Gb/s | 12 | 42.50 |
| SiComputers.nl | Verzending en afhandelng | 1 | 5.85 | |
| Routercenter.nl | GS108GE | Netgear GS108 8-Poorts Gigabit Switch Duo Pack | 1 | 73.00 |
| eoo-bv.nl | DA5M3X40 | Afstandsbus 1x binnen-1x buiten M3 40mm | 56 | 0.27 |
| eoo-bv.nl | Verzending en afhandelng | 1 | 7.00 | |
| Conrad.nl | 1293106 | MeanWell RSP-500-12 AC/DC 500W 12V/41.7A | 1 | 141.14 |
| Conrad.nl | 1082735 | DC aansluitkabel tweelingkabel | 13 | 2.30 |
| Conrad.nl | 735440 | Ringkabelschoen blauw 1.5 – 2.5mm M3.5 | 8 | 0.63 |
| Conrad.nl | 735327 | Ringkabelschoen rood 0.5 – 1.0mm M3.5 | 8 | 0.52 |
| Conrad.nl | 844519 | Krimptang | 1 | 6.29 |
| Conrad.nl | 1218498 | NK 103 S-500 5mm Zwart | 1 | 9.99 |
| aliexpress.com | G104 Free Shipping 20pcs/lot New PC Desktop Computer Case ATX Power On Reset Switch Cable With LED Light | 2 | 8.14 | |
| aliexpress.com | Verzending en afhandelng | 1 | 22.02 | |
| allekabels.nl | 1211537 | VD draad Lasklem 5-Draads | 1 | 24.95 |
| allekabels.nl | 1232 | Set Montagedraad | 1 | 19.95 |
| allekabels.nl | 1281460 | DC connector | 2 | 0.86 |
| allekabels.nl | 1047548 | Netwerkkabel CAT 5e – U/UTP | 16 | 0.92 |
| allekabels.nl | Verzending en afhandelng | 1 | 3.95 | |
| Kunstofshop.nl | Assortiment monsters | 1 | 25.00 | |
| aluminiumshop.nl | aluminium profielen op maat | 1 | 88.60 | |
| aluminiumshop.nl | verzending en afhandelng | 1 | 12.10 | |
| snijlab.nl | acryl op maat | 1 | 194.64 | |
| snijlab.nl | verzending en afhandelng | 1 | 8.07 | |
| led-voordeel.nl | Led Houders 5mm (50stuks) | 1 | 5.95 | |
| led-voordeel.nl | Verzending en afhandelng | 1 | 2.00 | |
| Hardware | €2,160.54 | 80.10% | ||
| Case | €323.36 | 11.99% | ||
| Cables | €132.66 | 4.92% | ||
| Tools | €6.29 | 0.23% | ||
| Shipping | €74.52 | 2.76% | ||
| Total | €2,697.37 |